Friday, May 31, 2013

Breakfast Pizza and Salmon Salad, two new week night favorites

I could have also called this goat cheese and arugula two different ways and it would be the truth.  What do you do with a giant log of goat cheese and a big tub of arugula?  There are probably a million answers to that question.  I chose to make breakfast pizza with goat cheese, cherub tomatoes, and arugula piled on top and then salmon on arugula with raspberry vinaigrette and goat cheese.


Arugula is unique.  You wouldn't expect a vegetable would taste peppery, but arugula does.  This is why I love it so much, just when you can't tolerate another romaine salad- switch it up and buy arugula.


Night one I knew was breakfast pizza.  But I wanted a somewhat sophisticated breakfast pizza if that was possible.  I did my research and settled on a mish mash from Smitten Kitchen and Inspired Taste.

Store bought pizza dough.  I like the kind that the store actually makes over the kind that pops out of a can.
Olive oil to brush the dough
Kosher salt
Fresh cracked pepper
Lemon zest
Goat cheese
Cherub or cherry tomatoes
Three eggs

Preheat the oven to 500
Start by prepping the dough.  First let it come to room temperature, about 30 minutes.  Then stretch it out to your desired size.  Brush with olive oil and sprinkle with the salt, pepper, and lemon zest. * The lemon zest really adds to it.
Top with dabs of goat cheese and the tomatoes.
Bake for 5 minutes
Remove from oven and slide on three eggs.  Return to the oven for about 7-10 minutes until the eggs are cooked to your liking.
I then topped mine with a few bacon pieces and the arugula.


And since it was breakfast for dinner, and since Sid the Science Kid had an episode about pancakes....


Dessert was chocolate chip pancakes with real whipped cream and strawberries.


And for the next night, that arugula and goat cheese was calling me, so I made a game time decision to make a Grilled Salmon Salad.  This was so easy, not just to make, but also just as important- it was easy to clean up.  I even had time to blog!

Start the grill on high for 10 -15 minutes.  Dry the salmon with paper towels and sprinkle with salt and pepper.  Reduce heat to medium and grill for 5-6 minutes on both sides- depends a bit on your grill.
While that is cooking rinse the arugula- I think this helps remove whatever residue remains after the "Triple Wash" that they promise.
Just top the arugula with the salmon, drizzle with the best store bought raspberry vinaigrette you can find and add goat cheese and raspberries.


This was so great even the girls asked for more of the dressing and arugula.  They aren't convinced about the goat cheese- but that is ok, more for me.

Friday, May 24, 2013

Flank Steak with Garlic Parsley Sauce and Grilled Romaine

I am in a broccoli rut.  When considering side dishes I have a tendency to start repeating myself.  Focusing on the main dish and leaving the vegetable to the... well... side.  But the vegetable can take center stage and really as I remind myself- it should.  So tonight I decided to try grilled romaine.  At first glance that may not sound even possible, but romaine can take the heat.  Just for approximately 2 minutes, but it can take it.  It comes out slightly charred and ready to roll.  Reviews tonight included... Refreshing!  Dad.  Easy and good for you!  Mom.


I knew I was making flank steak with an Italian flare.  I wanted to try out a new parsley garlic sauce recipe from Cooks Country.  I was thinking broccoli, but a girl does get a little tired of broccoli after a while.  I happened to have some romaine on hand... grilled romaine with red wine vinegar ice shavings sounded intriguing.  For this I turned to Alton Brown.  My favorite for food science.  He has the best homemade marshmallow recipe that I made exactly once.

   
I started with the Parsley Garlic Sauce.  This did triple duty.  First it flavored the steak after it was grilled and then I served a bit more drizzled on the steak.  I also used it to toss with some small red potatoes that I started in the microwave and finished in a grill basket outside.

Parsley Garlic Sauce
1/2 c minced parsley
2 cloves garlic
1/4 c red wine vinegar
1/4 c olive oil
1/8 t red pepper flakes 
salt and pepper to taste
Just whisk all ingredients together


Prepping the grilled romaine was easy.  To make it fun you can plan ahead and freeze 1/2 cup red wine vinegar in a shallow pan, then use a fork to make ice shavings to serve on top of the lettuce when it is done.  Once you have the steak on the grill you can quickly make the romaine, just slice and rinse, pat dry.  Brush with olive oil and sprinkle with pepper.  Then grill face down for about 2 minutes.  I served mine with some parmesan cheese and the red wine vinegar shavings.  If you look closely at the photo below, you can see the pink vinegar shavings. 


Week in Preview

Tuesday:  Greek salad with cucumber, tomato, pine nuts, and feta.  I'll grill some chicken to go with it and make extra for Wednesday.
Wednesday:  BBQ naan pizzas with salad
Thursday:  Breakfast for supper with fruit salad
Friday:  Salmon with broccolini and lemon bulgar salad

Saturday, May 18, 2013

Hostess CupCakes, only way better.

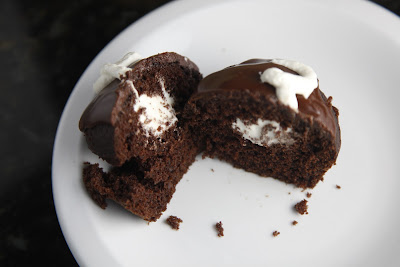
You always want what you can't have and now that I can't have a Hostess CupCake, I want one.  Or actually a more delicious homemade version of one.  These are something I remember from childhood, although I preferred the Nutty Bar, a Hostess CupCake would do just fine.  When I heard Hostess was going out of business I could not believe it.  No more Twinkies?  What a world!  Now it sounds like we will see them again, but for now I decided to make my own Hostess CupCake for Delle's second birthday.


It started with a search for cupcakes on Cook's Country.  This Chocolate Cream Cupcake popped up.  It is obviously the Hostess CupCake they were going for.  I decided it was perfect for a birthday cupcake.  Any adult knows that when you see that white doodle on top there is more waiting in the middle, but my girls were surprised!


It started with a rich instant espresso amped up chocolate cupcake.  Not only that but semisweet chocolate chips and sour cream, all together created a really deep and complex chocolate cupcake.  This is no box chocolate cake, there is real flavor here.


The creme filling is a butter/marshmallow creme confection that is syrupy sweet, but a perfect counterpoint to the complex chocolate cake.  And this part reminds me of my grandma.  This is how she perfected the cupcake.  Cut out a cone from the top, cut off the tip of the cone to make room for a tsp or so of cream.  Then pop the top back on.  She always had a few of her cupcakes in the freezer for me... and cookies in the cookie jar... and usually bread baking in the oven too.


The glaze is simple, just butter and semisweet chocolate, but-who knew?- this creates the perfect ganache.  My only tweak of the recipe?  Double the amount.  Maybe it was because I was licking too much off the spoon, but it just wan't enough.  Then for the final step, a doodle of marshmallow creme on top.  They don't look "perfect", but who wants perfect when you can have homemade?

CUPCAKES
  • 1cup all-purpose flour
  • 1/2teaspoon baking soda
  • 1/4teaspoon Salt
  • 1/2cup boiling water
  • 1/3cup cocoa powder
  • 1/3cup semisweet chocolate chips
  • 1tablespoon instant espresso
  • 3/4cup sugar
  • 1/2cup sour cream
  • 1/2cup vegetable oil
  • 2large eggs
  • 1teaspoon vanilla extract
FILLING
  • 3tablespoons water
  • 3/4teaspoon unflavored gelatin
  • 4tablespoon (1/2 stick) unsalted butter, softened
  •  Pinch salt
  • 1teaspoon vanilla extract
  • 1 1/4cups marshmallow crème 
GLAZE (I doubled this amount)
  • 1/2cup semisweet chocolate chips
  • 3tablespoons unsalted butter
INSTRUCTIONS
  • 1. MAKE BATTER Adjust oven rack to middle position and heat oven to 325 degrees. Grease and flour 12-cup muffin tin. Combine flour, baking soda, and salt in bowl. Whisk water, cocoa, chocolate chips, and espresso in large bowl until smooth. Add sugar, sour cream, oil, eggs, and vanilla and mix until combined. Whisk in flour mixture until incorporated. Divide batter evenly among muffin cups. Bake until toothpick inserted into cupcake comes out with few dry crumbs attached, 18 to 22 minutes. Cool -cupcakes in tin 10 minutes, then turn out onto wire rack and cool completely.
  • 2. PREPARE FILLING Combine water and gelatin in large bowl and let sit until gelatin softens, about 5 minutes. Microwave until mixture is bubbling around edges and gelatin dissolves, about 30 seconds. Stir in butter, vanilla, and salt until combined. Let mixture cool until just warm to touch, about 5 minutes, then whisk in marshmallow creme until smooth; refrigerate until set, about 30 minutes. Transfer 1/3 cup marshmallow mixture to pastry bag fitted with small plain tip; reserve remaining mixture for filling cupcakes.
  • 3. ASSEMBLE CUPCAKES Microwave chocolate and butter in small bowl, stirring occasionally, until smooth, about 30 seconds. Cool glaze to room temper-ature, about 10 minutes. Following photos 1 to 3 at left, cut cone from top of each cupcake and fill cupcakes with 1 tablespoon filling each. Replace tops, frost with 2 teaspoons cooled glaze, and let sit 10 minutes. Using pastry bag, pipe curlicues across glazed cupcakes. Serve. (Cupcakes can be stored in airtight container at room temperature for 2 days.)


Sunday, May 12, 2013

Black and White Cookies. Look to The Cookie.

I love cookies.  Does anyone not like cookies?  Chocolate chip of course.  My new dark chocolate sea salt shortbread jobbies are pretty awesome.  But looking back, the black and white cookie really steals the show.  Almost not even a cookie, it is more of a single serve cake.  You plop it over and ice the bottom half black and half white.


I first had one at a coffee shop in Madison.  Since then on the rare occasion that I see one for sale I have to give it a try.  Many are lacking: too sticky, too bland, too salty.  I decided to make my own and after a few trials I finally found a winner in Gourmet magazine.  Just like my original with a light cake-like cookie and lemony vanilla along side deep chocolate.


These are a commitment.  The cookie itself is a breeze, but if you make the traditional monster size- even doubling the recipe only produces 16.  Really, it is the icing that takes commitment.  You must make the vanilla and then turn half of it into chocolate.  Then you must go back to the cookie.  Not once, but twice to spread the icing.  My secret?  Once they are lovingly done, I hide them.  I wrap each individually with plastic wrap and find a safe spot in the freezer... inside an old box of frozen spinach for instance...and then stash them.  Take them out one at a time, they thaw in a few hours, and eat with my coffee in the morning.  Nothing better.


This time I had a purpose though, Allie's birthday treat at school.  So I made some mini-black and whites for her to take and still have about six monsters to wrap and secret away for next weekend's coffee.  I can't wait already.


Black and White cookies from Gourmet magazine 2002
This only makes 8 cookies, so I always double it.
An easy way to make buttermilk is to add 1T lemon juice to a measuring cup, fill the rest with 1/2 and 1/2 and wait for 5 minutes.

For cookies
  • 1 1/4 cups all-purpose flour
  • 1/2 teaspoon baking soda
  • 1/2 teaspoon salt
  • 1/3 cup well-shaken buttermilk
  • 1/2 teaspoon vanilla
  • 1/3 cup (5 1/3 tablespoons) unsalted butter, softened
  • 1/2 cup granulated sugar
  • 1 large egg

For icings
  • 1 1/2 cups confectioners sugar
  • 1 tablespoon light corn syrup
  • 2 teaspoons fresh lemon juice
  • 1/4 teaspoon vanilla
  • 1 to 2 tablespoons water
  • 1/4 cup unsweetened Dutch-process cocoa powder

preparation

Make cookies:
Preheat oven to 350°F.
Whisk together flour, baking soda, and salt in a bowl. Stir together buttermilk and vanilla in a cup.
Beat together butter and sugar in a large bowl with an electric mixer until pale and fluffy, about 3 minutes, then add egg, beating until combined well. Mix in flour mixture and buttermilk mixture alternately in batches at low speed (scraping down side of bowl occasionally), beginning and ending with flour mixture. Mix until smooth.
Spoon 1/4 cups of batter about 2 inches apart onto a buttered large baking sheet. Bake in middle of oven until tops are puffed and pale golden, and cookies spring back when touched, 15 to 17 minutes. Transfer with a metal spatula to a rack and chill (to cool quickly), about 5 minutes.
Make icings while cookies chill:
Stir together confectioners sugar, corn syrup, lemon juice, vanilla, and 1 tablespoon water in a small bowl until smooth. Transfer half of icing to another bowl and stir in cocoa, adding more water, 1/2 teaspoon at a time, to thin to same consistency as white icing.
Ice cookies:
Turn cookies flat sides up, then spread white icing over half of each and chocolate over other half.
Cooks'note:•If you can stand the wait, cookies taste better if cooled without being chilled.


Read More http://www.epicurious.com/recipes/food/views/Black-and-White-Cookies-106171#ixzz2T7rvFTkW


Wednesday, May 8, 2013

My best version of Michael's Peanut Butter Cup Sundae

If you know Madison, you have probably had custard at Michael's.  Since moving away I have been dreaming of the peanut butter cup sundae...literally dreaming.  I haven't found anything like it.  Vanilla custard covered with thin peanut butter sauce and then Magic Shell-esque chocolate.  But this stuff is really thick and rich, it gets too hard to cut with the spoon so you are forced to pick up gigantic pieces of chocolate and gnaw on them.


Disclaimer- this is the moderation part of Avocado and Beer.  Not meant to have every night or served in large portions, but enjoyed fully.  First I tried to get the Magic Shell stuff right.  Turns out this is surprisingly (and way too) easy.

Homemade Magic Shell
1 cup semi-sweet chocolate chips
2 T vegetable oil
Melt the chips in the microwave and then stir in oil until combined.

I did try this with coconut oil (as suggested on the internet) as well as vegetable oil.  The coconut oil was supposed to be closer to the original Magic Shell... it did recreate the thin breakable characteristics, but left an unpleasant coconut taste at the end.  And what I wanted was thicker richer.

I had to try two versions of peanut sauce as well.  The original was too thick, too grainy, and not peanut butter-y enough.  I finally found a version that is surprisingly close to my favorite chocolate sauce recipe.  It starts with the same ingredients, but instead of melting in the chocolate chips at the end, you melt in the peanut butter.  This one was so rich, salty, peanut butter-y perfect.

Best Peanut Butter Sauce
1/2 c whipped cream
1/4 c sugar
1/4 c corn syrup
2 T butter
1 t vanilla
1/2 cup peanut butter
salt to taste

In a small pot stir together the first four ingredients and heat until just bubbling and butter is melted.  Off heat stir in vanilla, PB, and salt until combined.

To recreate the custard I drove through Culvers and bought two pints of vanilla custard.  I happened to be alone on the way home from work.  The woman gave me the two pints of ice cream with a few napkins and a spoon.  I felt like I needed to explain myself...  And so after suffering four nights of attempts we declared victory!

Week in Review with photos to prove we ate healthy the rest of the time!

Sunday:  Cilantro lime grilled shrimp with cilantro/corn/rice and guacamole


Monday:  Turkey feta burger with my own version of Tzatziki sauce


Tuesday and Wednesday:  Spaghetti and meatballs.  I prepped these meatballs on Monday and used the same turkey burger, feta, panko mix.


Thursday:  Ham and turkey roll up sandwiches with salad
Friday: Halibut and Parmesan pea soup with Parmesan crisps

Thursday, May 2, 2013

Chicken fajitas with poblano peppers and BBQ chicken pizza

Chicken.  We have a love hate relationship.  Boneless skinless chicken breasts, they are so versatile and yet so bland.  I look to them often for work nights and like to make it a two night affair.  But to make it interesting takes some effort.

A frequent combo is slow cooker pulled chicken BBQ sandwiches and then tacos the next night.  It is always good and easy and I am sick of it.  So to put a spin on it this week I tried fajitas and BBQ chicken pizza.  I am now back in the love phase of our relationship.


This is after work.  So having some prep done is helpful here.  So I have about six chicken breasts ready to roll after cooking them for about 6-10 minutes (depending on thickness) on the George Foreman.  If you really want to be efficient you could slice three fajita style and cube the other three for the pizza.

To keep the fajitas easy I just sliced two poblano peppers (a nice departure from green peppers, more flavorful but no real heat-so still kid friendly) and softened them in a skillet with a little olive oil.  Then added the chicken and Frontera Classic Fajita Sauce.  I did make another radish relish and some guacamole to serve along side.  

Spicy pickled radishes
Clean and thinly slice about 10 radishes
Add 1/2 cup of fresh lime juice (3-4 limes)
Finely diced half jalapeno (with seeds and white stuff removed)
1 t sugar
1/4 t salt
Cover and let sit at room temperature for an hour


Then the next night is even easier!  I had some naan from the store, look in the bakery section or near the deli for this stuff.  I preheated the oven to 400.  Brushed the naan with olive oil.  Brushed it again with BBQ sauce.  Sprinkled with cheddar cheese and dropped on the diced chicken right from the fridge.  I baked it for 10 minutes and added a little cilantro.  That couldn't be any easier and it was quickly gobbled up.  I am going to have to make more next time.  We had this with the left over radish relish and a salad.

The week in preview

Sunday:  Skillet ziti and salad.  A kid favorite and mom favorite too for that matter
Monday and Tuesday:  The chicken duo.  Fajitas and BBQ chicken pizza
Wednesday:  Pork ribs on the grill with baked sweet potato and maple sour cream.  Broccoli slaw on the side.
Thursday:  Pan seared salmon with balsamic glaze and broccoli with lime vinaigrette