Sunday, December 29, 2013

Salted Caramel Chocolate Thumbprints

The name says it all with these cookies.  The cookie itself is dense and buttery.  The caramel is simple and salt content is per your own desire.  I have said before that I would eat a salted caramel covered shoe and these are much better than that.


I meant to get this blog post out before Christmas, but I also meant to do way too many other things before Christmas too, so here they are.  If you are on a post Christmas sugar crash and need to have a cookie.  Try these!

Salted Caramel Chocolate Thumbprints
Adapted from Cook's Country


INGREDIENTS

  • 1cup all-purpose flour
  • 1/3cup cocoa powder
  • 1/4teaspoon salt, plus sea salt or kosher salt for sprinkling
  • 8tablespoons unsalted butter (1 stick), softened
  • 2/3cup sugar

  • 2tablespoons milk
  • 1teaspoon vanilla extract

  • 14soft caramel candies (you could definitely make your own caramel and I always think that I will, but seriously it is nice to hit the easy button on occasion).
  • 3tablespoons heavy cream

INSTRUCTIONS

  1. 1. Adjust oven rack to upper-middle and lower-middle positions and heat oven to 350 degrees. Line 2 baking sheets with parchment paper. Combine flour, cocoa, and salt in bowl. With electric mixer on medium-high speed, beat butter and sugar until fluffy, about 2 minutes. Add egg yolk, milk, and vanilla and mix until incorporated. Reduce speed to low and add flour mixture until just combined. Refrigerate dough until firm, at least 1 hour.
    2. One at a time, roll dough into 1-inch balls. Place balls 2 inches apart on prepared baking sheets. Using teaspoon measure, make indentation in center of each ball. Bake until set, 10 to 12 minutes, switching and rotating sheets halfway through baking.
    3. Meanwhile, microwave caramels and cream in bowl, stirring occasionally, until smooth, 1 to 2 minutes. Once cookies are removed from oven, gently press existing indentations with teaspoon measure. Fill each with ½ teaspoon caramel mixture.  Sprinkle with sea salt or kosher salt.  Cool 5 minutes, then transfer to wire rack and cool completely.


I am also excited about the menu that follows.  Some favorite winter dishes and some great disguised left overs so it never gets boring.  I made beef stew on Sunday.  That night we had it with some crusty oven bread.  Monday night I had it with egg noodles- I thought about adding some sour cream to make impromptu stroganoff, so that is an option too.  Then Tuesday night I added beef broth and barley to make an awesome soup.

The Week in Review
Sunday, Monday, Tuesday:  Variants of beef stew.  Served with crusty bread, then with egg noodles as pseudo-stroganoff, then as beef barley soup!

Wednesday and Thursday:  Lemon pesto chicken noodle soup.  A favorite old standby.

Friday and Saturday:  Turkey/beef chili.


I came up with the beef barley soup idea after my weekly shop.  So I ran into Walmart in a mad rush to get barley and get home after work.  Of course I had no idea where barley was.  I spotted the rare Walmart worker and made eye contact.  I got to ask my question, but I quickly realized she was not in the know.  It was definitely not her job to help the wild eyed late mother with barley.  But she sent out an APB on her walkie talkie.  Then when no one else knew where barley was, she started walking with me.  She was like a navy seal for barley "We are going to find this mam", she said.  And we did.

Saturday, November 30, 2013

Homemade hummus to try even if you don't like hummus, really.

I love homemade hummus.  For one thing, it is a great way to sneak some protein into school lunches.  Especially when I have one that doesn't like cheese or peanut butter.  I know, shocking.  For another thing, it is a break from ranch dressing as a dip for carrots and cucumber.  But why not just buy what is in the store?  That is what I said until the store stopped carrying our variety and the new stuff wasn't the same.  So I bought a can of chickpeas and found out how simple, fast, light and fluffy the homemade version is.  My hummus recipe is simple, but good enough to have a four year old ask for it for her birthday, so it must be good.  Well worth it.


Hummus
adapted from Cook's Country

INGREDIENTS

  • 1/4cup water
  • 2tablespoons lemon juice
  • 1/4cup tahini, stirred well (pricey, but it lasts forever.  I found ours in the PB section)
  • 2tablespoons extra-virgin olive oil
  • 1(15-ounce) can chickpeas, rinsed (I take the skins off, or have my kids help.  It makes the hummus much smoother)

  • 1garlic clove, minced
  • 1/2teaspoon salt
  • 1/4teaspoon ground cumin
  • Pinch cayenne

INSTRUCTIONS


  1. 1. Combine water and lemon juice in bowl; set aside. Whisk tahini and oil together in second bowl.

    2. Process chickpeas, garlic, salt, cumin, and cayenne in food processor until coarsely ground, about 15 seconds, scraping down bowl as needed. With food processor running, slowly add water mixture until incorporated and process until smooth, about 1 minute. With food processor still running, slowly add tahini mixture until incorporated and process until creamy, about 15 seconds, scraping down bowl as needed.

    3. Transfer hummus to serving bowl, cover with plastic wrap, and let sit until flavors meld, at least 30 minutes. (Hummus can be refrigerated for up to 5 days.) Serve.


A week of meals

Sunday and Monday:  Tuscan Chicken.  I love white beans in the winter, we'll have it with roasted cauliflower.  I seriously can't wait.
Tuesday:  Broccoli calzones with frozen broccoli florets and store prepped pizza dough.  It makes calzones weeknight possible.  This recipe has some feta tucked in there too... so good.
Wednesday:  Skillet ziti with garlic bread
Thursday: Grilled salmon with asparagus and toasted orzo
Friday:  Roast beef (a first time for me).  With mashed potatoes, gravy, and broccolini.

Friday, November 22, 2013

Make any night Thanksgiving or just make Thanksgiving a little easier

Every now and then I run into a roadblock when trying to make my weekly menu.  When that happens I go to one of the usual suspects; something mexican, chili, or weeknight Thanksgiving.  To make a holiday happen on a weeknight takes a little prep work the day before, but little to no prep before eating the feast itself.  The turkey cooks in the slow cooker and stays surprisingly moist.  The gravy cooks right along with it.  Sometimes I'll make a quick box of Stovetop Stuffing or make mashed potatoes ahead of time.  Just some frozen french cut green beans in the microwave and dinner is on the table!  Plus think of all the left overs that you wait all year to have... turkey panini with cranberry, turkey noodle soup, and turkey tetrazzini... makes meal planning easy for days!  And this isn't sub-par turkey, it is some of the best moist flavorful turkey I have ever had.  You could even have it on the REAL Thanksgiving!  I suppose making it in the slow cooker isn't very prestigious, but no one will care when they eat it.


Slow Cooker Turkey with Gravy
adapted from Cooks Country


INGREDIENTS

  • 1(6- to 7-pound) bone-in turkey breast, trimmed
    3  tablespoon unsalted butter
  • 1onion, chopped coarse (optional I always skip the onions)
  • 1carrot, peeled and chopped coarse  (or more, I like veggie gravy)
  • 1celery rib, chopped coarse
  • 6garlic cloves, peeled and smashed
  • 7tablespoons all-purpose flour
  • 2cups low-sodium chicken broth
  • 1/2cup dry white wine (don't skip this, it gives the gravy have depth of flavor)
    2       bay leaves
  • Salt and pepper

INSTRUCTIONS


The night before
  1. 1.  Melt butter on the stove.  Add onion, carrot, celery, and garlic and cook until vegetables are browned, 8 to 10 minutes. Whisk in flour and cook, whisking constantly, until golden, about 2 minutes. Slowly whisk in broth and wine and bring to boil. Transfer gravy and bay leaves to slow cooker.

    2. Season turkey with salt and pepper and place meat side up in slow cooker.  Refrigerate.
    The morning of the feast
    3.  Cover and cook on low until breast registers 160 degrees, 5 to 6 hours.

    4. Transfer turkey to carving board, tent loosely with aluminum foil, and let rest for 15 to 20 minutes.  If you prefer smooth gravy, strain out the veggies, I liked the vegetables so left it as is!  Season with salt and pepper to taste. Carve turkey and serve with gravy.


    The meal plan


    Sunday:  Prep turkey and gravy 
    Monday:  Weeknight Thanksgiving.  Turkey, mashed potatoes, broccoli.
    Tuesday:  Turkey panini with gouda and cranberry sauce.  Cut up carrots on the side.
    Wednesday:  Turkey noodle soup with brussels sprouts and squash with cider glaze.  Not something I would have considered as a child, but now a favorite.
    Thursday:  Simple buttered angel hair spaghetti with parmesan and caprese salad- mozzarella and tomato with balsamic vinegar.
    Friday:  Baked cod with ritz cracker topping, frozen french fries, and salad.

Saturday, October 26, 2013

Crazy mix up with Breakfast Pie for supper

Whenever I ask my girls what they want for supper I hear some crazy things.  Hummus!  Chips and salsa!  Breakfast!  Breakfast... for supper is a favorite around here, for some reason this crazy mix up is just enough to get the girls all excited about supper.  A few weeks ago I blogged about Make Ahead Breakfast Casserole, which is awesome if you have time to "make ahead".  But if you are down to the wire and have just four eggs on hand consider the Breakfast Pie.  My skeptic husband even loved it, he said it trumped the casserole!

We all loved this recipe and what made it even more special is my 7 year old's contribution.  She is my salsa lover.  I have a big box of generous-neighbor tomatoes and have been making salsa, but my salsa motivation was wearing off.  So she decided to take over.  With my supervision only she prepped the tomatoes, jalapeno, red pepper, garlic, salt, pepper, and lime juice.  She even pulsed it in the food processor.  So we ended up having breakfast pie with homemade salsa.

Breakfast Pie
Adapted from Cooks Country


INGREDIENTS
  • 1tablespoon unsalted butter, softened, plus 2 tablespoons melted
  • 3tablespoons finely grated Parmesan cheese
  • 8ounces Gruyère cheese, shredded (2 cups).  I used some havarti that I had on hand... remember that Fraiser episode?  "Havarti?  Gouda!"
  • 4ounces thickly sliced deli ham, chopped
  • 4scallions, minced
  • 1/2cup (2 1/2 ounces) all-purpose flour
  • 3/4teaspoon baking powder
  • 1/2teaspoon pepper
  • 1/4teaspoon salt
  • 1cup half-and-half
  • 4large eggs, lightly beaten
  • 2teaspoons Dijon mustard
  • 1/8teaspoon ground nutmeg
INSTRUCTIONS
  • 1. Adjust oven rack to lowest position and heat oven to 350 degrees. Grease 9-inch pie plate with softened butter, then coat plate evenly with Parmesan.
  • 2. Combine Gruyère, ham, and scallions in bowl. Sprinkle cheese-and-ham mixture evenly in bottom of prepared pie dish. 


    3.  Combine flour, baking powder, pepper, and salt in now-empty bowl. Whisk in half-and-half, eggs, melted butter, mustard, and nutmeg until smooth. Slowly pour batter over cheese-and-ham mixture in pie dish.

  • 4. Bake until pie is light golden brown and filling is set, 30 to 35 minutes. Let cool on wire rack for 15 minutes. Slice into wedges. Serve warm.


    The weekly menu
    Thursday:  Unwrapped Chicken Cordon Bleu.  I have ham to use up!
    Friday:  Salmon with greek orzo and cucumber salad
    Monday and Tuesday:  I am excited about this one!  I found an ingenious slow cooker recipe that cooks the potatoes nestled right in the pot.  When all done you fish them out and make mashed potatoes!
    Wednesday:  My favorite steak fajitas and lots of peppers
    Thursday:  Halloween!  Bloody bones and fearsome apples.  Ha ha ha ha!!  In other words premade pizza dough rolled into bones and dunked in pizza sauce and apples with almond sliver mouths.  I'll take some photos:)

Friday, October 11, 2013

Soft Pretzels for Oktoberfest or Anytime Really

My new favorite food on the planet is homemade soft pretzels.  They are easy to make, and that is coming from someone formerly intimidated by yeast.  They are great alone right out of the oven.  They are also quite tasty dunked in beer cheese soup and are shockingly good as an egg sandwich for breakfast.  My inspiration came from Oktoberfest, but I will make these all year long.

The process itself is a little surprising.  To get that dark exterior and keep them dense instead of fluffy like bread... there is a step that involves boiling the raw pretzels in water and baking soda.  Not what I would have expected.  But when I opened the oven door that first time I was amazed to see what really looked like soft pretzels staring back at me.


Homemade Soft Pretzels
adapted from Cooks Illustrated

INGREDIENTS

  • 1teaspoon instant yeast
  • 1/4cup honey
  • 1teaspoon Salt
  • 3cups (16 1/2 ounces) bread flour
  • 1cup warm water, (about 110 degrees)
  • 3tablespoons baking soda
  • 2tablespoons coarse salt

INSTRUCTIONS

  1. 1. Mix together the yeast, honey, salt, flour, and water in the bowl of a standing mixer. Using the dough hook, knead at low speed until a smooth, elastic ball of dough forms (the dough will be quite stiff), 5 to 7 minutes.  The first time I have used my dough hook and I am glad I even knew where it was!
  2. Place the dough in a lightly oiled large bowl and turn the dough to coat with the oil. Cover with plastic wrap and let rise at warm room temperature until doubled in size, 1 to 1 1/2 hours. Deflate the dough, cover, and let rise until nearly doubled in size again, 30 to 40 minutes.  In a cool dry kitchen you may have trouble.  I boiled water in a coffee cup in the microwave then left the bowl in there to rise.
  3. Meanwhile, adjust an oven rack to themiddle position and heat the oven to 450 degrees. Pour 6 cups water into a 12-inch skillet add the baking soda, stir, cover, and bring to a boil over high heat. Line a baking sheet with aluminum foil and spray generously with vegetable cooking spray. Set aside.
  4. 4. Divide the dough into 12 equal pieces (about 2 ounces each). Roll each piece into a 20-inch-long, 1/2-inch-wide rope. Shape each rope into a pretzel and place on the prepared baking sheet.  I found that rolling on the table was impossible.  It worked better to roll it between my hands and then use, what I called, the jump rope technique to stretch it out.


  5. Using a wire skimmer or slotted spoon, gently place the pretzels into the boilling water, top-side down (you should be able to fit 3 or 4 pretzels at a time), for 30 seconds. Using tongs, carefully flip the pretzels over and boil for 30 seconds longer. Remove the pretzels with a slotted spoon, drain well, and place back onto the prepared baking sheet (because the pretzels will not rise much in the oven, you should be able to fit all 12 pretzels on one baking sheet). 


    Sprinkle with coarse salt or sesame or poppy seeds (if using) and bake for 12 to 16 minutes, or until the pretzels are well-browned, turning the baking sheet halfway through the baking time. Remove the pretzels from the baking sheet to a wire rack. Serve warm or at room temperature.


 You may be able to make a batch and a half in a Kitchenaid Mixer, but beware it has to work pretty hard to mix the stretchy dough.  I have found that big soft pretzels also make great comfort food.

The week

Sunday:  Turkey meatloaf and baked potato with broccoli.  I divide the meatloaf into a cupcake tin, the girls love the cute little personal sized meatloaves.

Monday:  Flank steak fajitas with peppers and guacamole.  The fajitas I make are marinated with 1/2 cup italian dressing, 1/2 cup salsa, lime juice, and worcestershire.  They are the best.

Tuesday:  Tuna melt and CSA carrots.  These taste so much more "carrot-y" than the store bought baby carrots.  I think I almost forgot what carrot was supposed to taste like.

Wednesday:  My faux meatball spaghetti.  I try to trick them with portabella mushrooms.

Thursday:  It is starting to be chili weather.  The best with extra kidney beans and cornbread.

Saturday, September 7, 2013

Best Picnic Lunch; Pressed Grilled Chicken Sandwich and Mascarpone Fig Dessert Sandwich

I am sensing a food trend starting.  Or perhaps it has already started and I am just catching on, but I have been thinking a lot about the pressed sandwich lately.  We had the occasion for a picnic a few weeks ago and I always want to do that one extra thing to make it special.  So instead of peanut butter and jelly, I scouted out the fridge and threw together a giant baguette sandwich, only made edible by pressing beneath my heaviest dutch oven.  If I had thought ahead I would have done this overnight, but true to my style had no extra time.  So it was pressed beneath my dutch oven and... me.  I put the thing on the floor and stood on it.  Hey it worked.

Pressed Grilled Chicken Icebox Sandwich

Baguette
Pesto


Leftover (or not) grilled chicken
Cherry tomatoes

A little extra basil to up that pesto flavor


Some really awesome gouda.  Cheddar is overrated, get some gouda.


I added some diced pancetta just because it was in the icebox


Put the whole thing together carefully and press it.  Some descriptions include bricks and lots of cling wrap.  Mine just involved a dutch oven and gravity.  If I had time I really would have done this part over night, but express pressing worked just fine too.

Before and after the express press

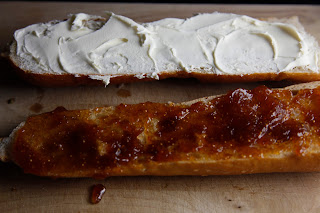
And don't forget the dessert.  I used the rest of the baguette to make a fig jelly and mascarpone masterpiece.


Fig is totally underrated.


I pressed this one too and once mushed together the baguette/fig/mascarpone somehow morphed into donut like deliciousness.


Add a few peaches, water, (or if you happen to not be pregnant) some nice chilled white wine, and there you have the best picnic lunch ever!

Week in Preview
Sunday:  Another Packer Sunday and I admit I have been looking forward to the excuse to have my Beer Cheese Soup, soft pretzel, and roasted broccoli again.
Monday, Tuesday, Wednesday:  I am going to ask my husband to grill lots of chicken.  I am talking six pounds of chicken breasts.  He will think I am crazy until he has Grilled Chicken Arugula Sandwiches with watermelon salad on Monday, Grilled Chicken Sesame Noodles and veggies on Tuesday, and BBQ Grilled Chicken Naan with salad on Wednesday.
Thursday:  This is CSA day and I am picturing lots of fresh tomatoes.  So I am making a bunch of homemade salsa, some guacamole, and making some turkey nachos.

Sunday, August 18, 2013

Easy Make Ahead Breakfast Casserole

This recipe has three of the best phrases to be ever be found in a recipe.   It starts with "easy" which is a always a good thing.  Follow that up with "make ahead".  This is excellent because you need supper on the table about five minutes after you walk in the door.  And add to that "casserole".  Love that because it usually implies that there is an entire meal in one 9x13 dish.  Put easy/make ahead/casserole together and you have a winner of a recipe.  Plus, this one tastes awesome.  We had it Monday and Tuesday nights for our supper, and it will make another appearance at a baby shower brunch I am hosting in September.


Adapted from Cook's Country
INGREDIENTS
  • 1(14-inch) loaf italian bread
  • 1small onion, chopped fine
  • 3cups shredded extra-sharp cheddar cheese
  • 12large eggs, lightly beaten
  • 4cups whole milk
  • 1 1/2teaspoons salt
  • 1teaspoon pepper
  • 1tablespoon hot sauce (see note)
  • Breakfast meat of your choice.  I used about 1/2 pound of diced ham, but the original recipe called for 1 lb of pork sausage.
INSTRUCTIONS
  • 1. Toast Bread Adjust oven racks to upper-middle and lower-middle positions and heat oven to 400 degrees. Spread sliced bread in single layers on 2 rimmed baking sheets and bake until golden, 15 to 20 minutes, flipping bread and switching and rotating sheets halfway through. Let cool 15 minutes.

  • 2. IF using sausage=Brown Sausage Cook sausage in large skillet over medium heat until no longer pink, about 5 minutes. Add onion and cook until golden, about 5 minutes.  
  • 3. Assemble Casserole Grease 13- by 9-inch baking dish. Shingle half of bread in prepared pan so that edges overlap slightly. Top with half of sausage mixture Here I substituted 1/2 the diced ham and 1 cup cheese. Repeat with remaining bread, remaining sausage mixture, and remaining cheese.

  • 4. Soak and Weight Whisk eggs, milk, salt, pepper, and hot sauce in large bowl. Pour evenly over casserole. Wrap casserole with plastic and weight according to photos below. Refrigerate for at least 1 hour and up to 24.

  • 5. Bake Casserole Adjust oven rack to middle position and heat oven to 350 degrees. Let casserole stand at room temperature while oven is heating. Remove weights, unwrap casserole, and bake until the edges and center have puffed and top is golden brown, about 1 hour. Let cool 10 minutes. Serve.

    To really have things ready for a make ahead meal I made a few baked potatoes ahead of time.  Then the day of the make ahead meal I diced them and sauteed them in a little butter/salt/pepper= easy make ahead breakfast potatoes.  To round it out we had a very nice fruit salad.

    The week in review
    Friday:  For the Packer Game we had to have our first Beer Cheese Soup of the year.  I paired it with this really really great roasted garlic broccoli and big soft pretzels from the freezer section.  I am going to make this combo again soon.
    Sunday:  Easy turkey tacos with extra veggies thrown in and guacamole.
    Monday and Tuesday:  The afore mentioned egg dish with fruit salad and potatoes.
    Wednesday:  Grilled chicken breasts with arugula mayonnaise on ciabatta rolls and my new favorite watermelon feta salad with lemon vinaigrette.